
Quick answer: To order custom fishing tournament shirts, establish the garment, approximate quantity, delivery city and in-hands date first. Prepare one controlled roster and one sponsor placement sheet, approve the physical sample and final artwork, then release the order with confirmed size totals, packing instructions and a delivery plan.
A tournament shirt order can look simple on a mockup and become complicated in production. The captain changes a sponsor, two anglers need a different fit, a name is spelled differently in a message, and the event date stays fixed. Each change affects a specific garment or file.
Give one team representative responsibility for final approval. They should maintain the current roster, collect sponsor feedback and send one clear decision to the supplier. Team members can review their details without creating several competing production lists.
In this guide: Start with the event brief · Build the roster · Map the sponsors · Final sign-off.
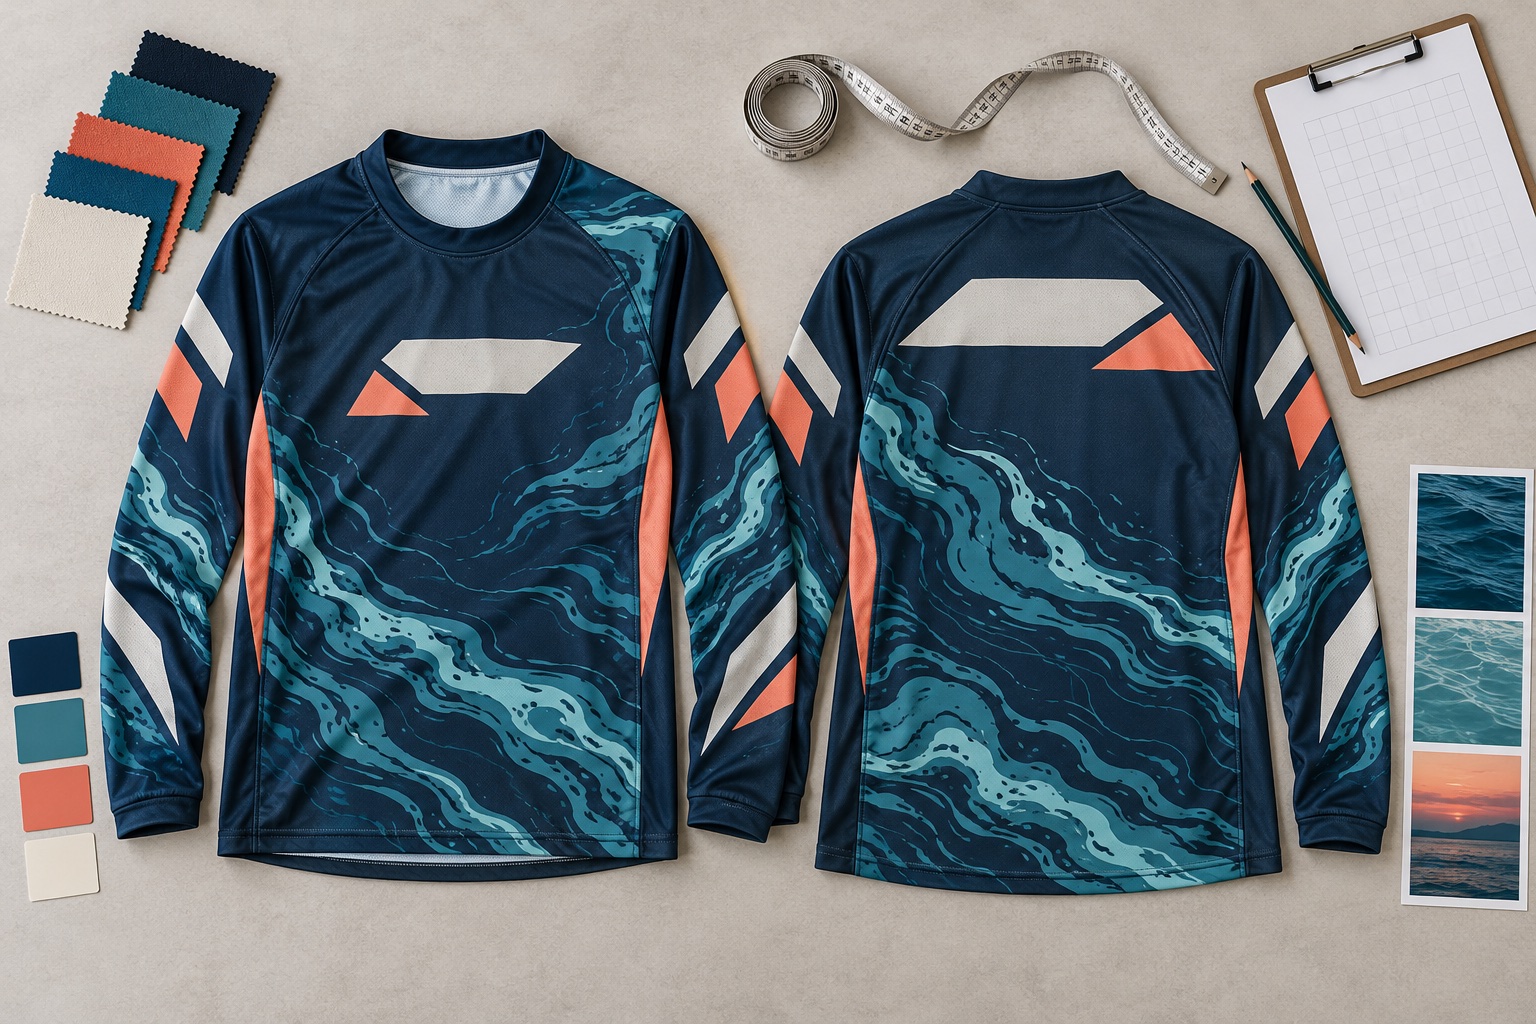
1. Start with the event brief and the date shirts must arrive
The most useful first message tells the supplier what the team needs and what cannot move. Send the shirt type, estimated quantity, destination and in-hands date: the day you must receive and check the shirts before the event. If shirts must be handed out early, use that earlier date.
Choose the garment around its job. A full-sublimation tournament jersey gives artwork and individual data a different production route from a restrained embroidered polo or vented button-up for a charter crew. A reference image helps communicate direction, but confirm the actual fabric, construction and measurements during development.
| First-brief field | What the supplier needs |
|---|---|
| Team and use | Tournament, club, charter crew, sponsor event or resale program. |
| Garment | Crew neck, polo, hoodie or button-up; sleeve length and intended fit. |
| Estimated pieces | Total quantity and likely splits by style, colorway and fit. |
| Destination | Delivery city, country and whether the shipment goes to one address. |
| In-hands date | When the complete order must be received, checked and ready to distribute. |
| Artwork status | Number of sponsors, available files and whether the design is already approved. |
| Performance needs | Fabric direction, stretch, coverage and any required test evidence. |
You can begin this discussion before every team member confirms a size. Tell the supplier which details remain open so development can proceed without treating estimates as final production instructions.
2. Plan backward from delivery
A ship date is the date goods leave a facility. An arrival estimate concerns transport. Neither automatically establishes when your team can unpack, check and distribute the shirts. Build the schedule around the whole sequence.
| Stage | Required decision or output | What can delay the next stage |
|---|---|---|
| Brief and material review | Garment direction, fabric route, estimated quantities and feasibility. | Unavailable material, unclear product requirements or an unworkable deadline. |
| Sample and artwork development | Sample, print proof or strike-off as agreed for the project. | Missing artwork, fit decisions or sample revisions. |
| Final approval | Approved specification, sponsor map, roster, quantities and commercial conditions. | Sponsor changes, spelling corrections or unresolved size totals. |
| Bulk production and inspection | Production against approved records and agreed acceptance checks. | Material issues, production changes or corrective work. |
| Packing and transport | Reconciled packing list, shipment booking and delivery responsibilities. | Packing changes, transport availability, customs or destination delivery. |
| Team distribution | Receipt check and individual handout. | Shortages or distribution errors that need time to resolve. |
Ask the supplier to confirm stage dates and the approvals they depend on. Allow a contingency appropriate to the shipment and the event. Avoid building the plan around a generic “two-week turnaround” from another product or a previous order. Our MOQ, sampling and lead-time guide explains the main manufacturing dependencies.
3. Build a roster with one row per physical shirt
Use a spreadsheet as the production record. A message such as “Alex needs two large shirts” leaves room for confusion if one garment has a different printed name or sponsor version. Give every physical shirt a unique line and shirt ID, including extras and replacements.
The supplier needs the printed name, not an unnecessary collection of personal details. Avoid adding home addresses, identification documents or other information that does not help produce and pack the garment.
| Shirt ID | Printed name | Number | Fit | Size | Colorway | Artwork version |
|---|---|---|---|---|---|---|
| T001 | J. Carter | 07 | Men’s regular | L | Navy / teal | ART-03 |
| T002 | M. Lewis | 14 | Women’s fit | M | Navy / teal | ART-03 |
| T003 | CREW | — | Men’s regular | XL | Navy / teal | ART-03 |
These rows are fictional examples. Size labels only have meaning when linked to the approved measurement chart and garment pattern.
Check the following before the roster is approved:
- Confirm spelling, punctuation, capitalization and leading zeros in numbers. Format the number column as text in your spreadsheet so “07” does not silently become “7”.
- Link each fit and size to the correct measurement chart. A women’s M and a men’s M are not interchangeable instructions.
- Count rows by style, colorway, fit and size. Reconcile the totals with the purchase order.
- Record spare shirts as their own rows, with the intended name or blank treatment stated explicitly.
- Give the approved file a version and date. Corrections create a new version rather than an untracked edit.
Use our fishing apparel size charts as a reference, then approve the actual program’s fit and measurements. Mixed men’s, women’s or youth patterns should be identified in the quote rather than hidden inside one size total.
4. Approve a sponsor placement map
Create a visual map and a matching list. The map shows where a sponsor belongs; the list identifies the exact file and dimensions. “Put the sponsor on the left” is incomplete unless both parties agree whether left means the wearer’s left or the viewer’s left.
Assign an ID to each placement. Record the panel, finished width and height, color reference, artwork version and approving person. Confirm the permission to use each mark through the team or sponsor before providing it for production.
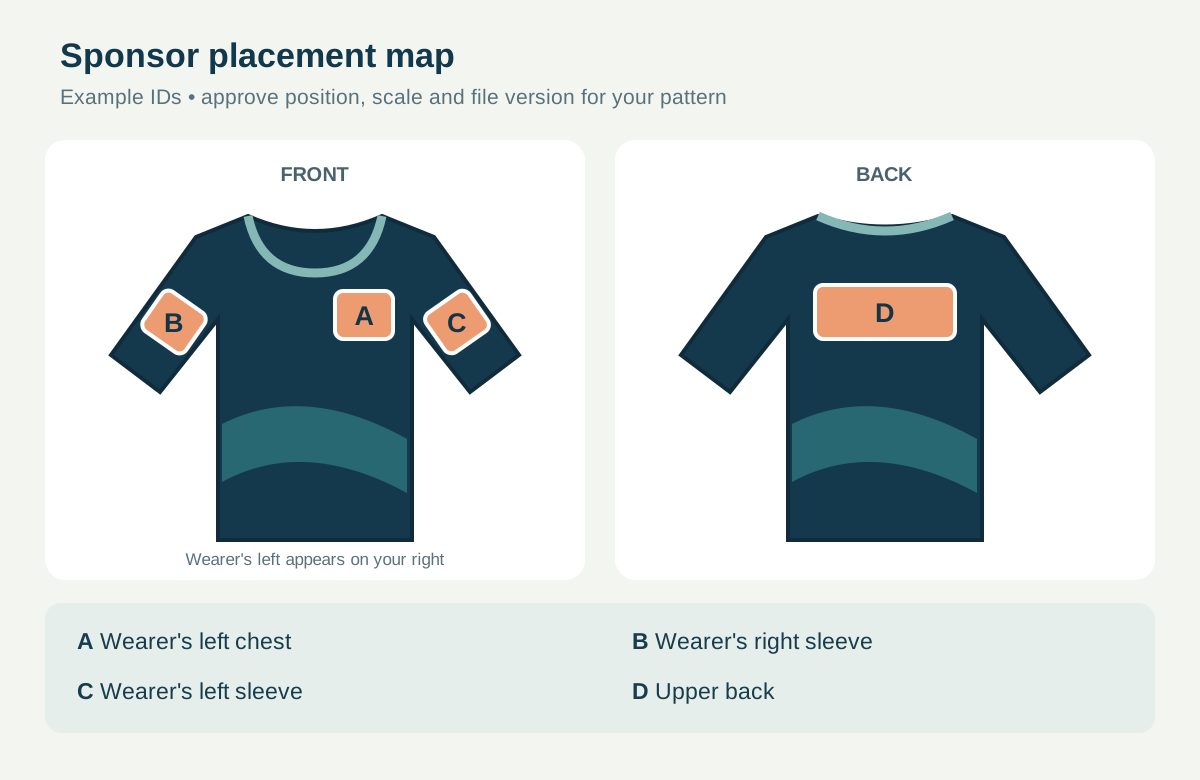
| Placement field | Example of a clear instruction |
|---|---|
| ID and panel | A — wearer’s left chest, front body panel. |
| Artwork | Sponsor file ID, filename and current approved revision. |
| Finished dimensions | Width and height in an agreed unit, confirmed on the proof. |
| Position reference | Distance from an identified seam or measurement point. |
| Color and contrast | Approved reference and treatment for dark or light backgrounds. |
| Size-range handling | Confirm whether scale or location changes across the graded sizes. |
| Approval | Named team approver, date, status and related artwork version. |
Keep important logos clear of seams, pockets, zips and areas where the garment curves away from view. Sleeve artwork needs checking on the sewn sleeve, not only on a flat rectangle. A position that looks balanced on an adult large mockup may need adjustment on a youth pattern.
Supply the best original artwork available, ideally a suitable vector file for logos. Vector artwork can be resized without the same pixelation problems as an enlarged raster image; Adobe’s vector-file guide explains the distinction. Ask the supplier to review the file before the proof stage. A screenshot enlarged from a messaging app can leave poor edges or missing detail. Changing the filename extension does not turn that image into vector artwork.
5. Review the sample and proof against the same records
The garment sample, digital proof and roster answer different questions. The sample allows you to assess fabric, fit and construction. The print proof shows artwork and variable data. The roster defines which version belongs to each shirt. Establish which checks use a physical sample and which use a digital proof before approval.
Review the sample in the intended use position: arms reaching forward, sleeves extended and any collar or hood worn as expected. Check measurements against the agreed chart. For sponsor marks, assess scale and legibility on the sewn garment, not just on a phone screen.
Before signing off, confirm:
- The material, garment construction and any substituted sample components are documented.
- Key measurements and fit match the approved specification and tolerances.
- Colors and sponsor treatments have the agreed reference; screen appearance alone is not the physical color standard.
- Names and numbers match the roster, including capitals and leading zeros.
- Logo positions, clearances and size-range handling match the sponsor sheet.
- Labels, packing requirements and any product-specific test evidence are settled.
Save one approval record listing the specification, sample, artwork and roster versions. “Looks good” attached to an old screenshot is difficult to reconcile with a newer production file.
6. Freeze the order and control late changes
Agree on a release point before variable print files are generated and production starts. At that point, the team approver confirms the final roster and sponsor sheet, and the supplier confirms the approved versions it will use.
If a sponsor joins later or a player changes size, ask whether the affected production step has started. The supplier should identify the files or garments affected, any extra cost and the effect on delivery. Approve that revised plan in writing before the change is released. Once panels have been printed or cut, a change can require remaking them.
For later replacements or new members, retain the approved pattern, artwork, measurements and material references. Reorders still need a new quantity and availability review; keeping records does not make every fabric or small repeat quantity automatically available.
7. Reconcile packing and check the delivery
Choose a packing method that matches the handout process. A club may prefer individual bag labels keyed to shirt IDs; an event organizer may need cartons grouped by team or size. Agree on this before the shirts are packed.
The final packing list should reconcile with the released roster, including extras. On receipt, check the cartons and quantities, then inspect names, numbers, sizes and sponsor versions before distribution. Report discrepancies with the shirt ID and clear photographs so the supplier can trace the affected record.
Final sign-off checklist
| Approval | Record to retain |
|---|---|
| Garment and fabric | Approved specification, measurement chart and material reference. |
| Sample | Identified physical sample or agreed sample approval record. |
| Sponsor artwork | Placement sheet and final proof version. |
| Individual shirts | Final roster, size totals and purchase-order reconciliation. |
| Packing | Bag labels, carton grouping and packing-list format. |
| Delivery | In-hands target, shipping plan and agreed responsibilities. |
| Release | One team approver and the supplier’s confirmation of the versions received. |
An example from an 800-shirt club program
Our Australian fishing club case study records 800 long-sleeve sublimated shirts in four colorways of 200 pieces each. The selected fabric was 170 GSM, 92% polyester and 8% spandex, with UPF 50+ performance specified for the program. The recorded stages were two days of brief alignment, a 10-day sample, three weeks of bulk production and two weeks of transport.
For this guide, the useful lesson is the separately defined color and quantity split: four complete groups had to reconcile with the total. The same approach applies to a roster with several fits or sponsor versions. Those recorded durations describe that project and should not be used as a delivery promise for another order.
Send the event date and the current brief
You do not need a finished roster to ask whether a project is feasible. Send the in-hands date, delivery city, shirt type, approximate quantity and sponsor count, and identify the decisions still open. We can review the garment direction and development plan while you assemble the final team information.
EZ Fishing Wear’s starting MOQ for custom fishing shirts is 100 pieces per style and colorway, with sizes normally mixed within an approved style. Different fits, materials, colors, decoration or packing requirements are reviewed before the final minimum and schedule are confirmed. Request a team order review.
Tournament shirt ordering questions
Can every shirt have a different name and number?
Sublimated team shirts can include individual names, numbers and approved variations. Link each physical shirt to one roster row and the correct artwork version. Confirm spelling and freeze the final list before variable files are released.
Can we order before all sponsors are confirmed?
You can discuss the garment, material and delivery feasibility early. Ask the supplier which artwork approvals must be complete before sampling or production release. A later sponsor can change placement, print files and the delivery plan, so identify the sponsor deadline at the start.
How many weeks before a tournament should we start?
Start while collecting the roster, then ask for an order-specific schedule. Work backward through transport, inspection, bulk production, sample approval and revisions. The required window depends on the product, quantity, material availability, approval speed and destination.
Can men’s, women’s and youth sizes be combined?
Identify each fit in the brief and roster. Different patterns may create separate development work or minimums. Confirm the actual size charts and quantity assumptions in the quotation rather than treating every size label as part of one interchangeable fit.
Written by Victor, Founder of EZ Fishing Wear. Templates and diagrams are planning tools. Final garment specifications, approvals, quantities, responsibilities and dates must be confirmed for the individual order.